 I got a plastic stick welder for Christmas. Essentially it's a heat gun with a small tip and a knob on the base to control the temperature of the air. After messing about with the different tips and burning some paint off of a steel pipe, I remembered that some iron forges use a heater for the air before it goes to the blast furnace. So I took two tin cans, one large and one a bit smaller and poked a hole in the side of the big can, and found a short section of 3/8" iron pipe that the welder nozzle fit into. Two lumps of charcoal in the bottom and a few pop cans smashed into the small tin can, the fire lit itself from the welder heat, and quickly heated to cherry red and melted the aluminum into a few tablespoons of slag. Then it burnt a hole into the bottom can opposite the air inlet and jumped to white hot for about 10 seconds as the last of the charcoal vaporized. The tin from the bottom can had melted and stuck to the rocks underneath. This is much to small to be of real use, it's difficult to fit the scrap into such a small crucible.
Tuesday, December 30, 2008
Plastic Welder
I got a plastic stick welder for Christmas. Essentially it's a heat gun with a small tip and a knob on the base to control the temperature of the air. After messing about with the different tips and burning some paint off of a steel pipe, I remembered that some iron forges use a heater for the air before it goes to the blast furnace. So I took two tin cans, one large and one a bit smaller and poked a hole in the side of the big can, and found a short section of 3/8" iron pipe that the welder nozzle fit into. Two lumps of charcoal in the bottom and a few pop cans smashed into the small tin can, the fire lit itself from the welder heat, and quickly heated to cherry red and melted the aluminum into a few tablespoons of slag. Then it burnt a hole into the bottom can opposite the air inlet and jumped to white hot for about 10 seconds as the last of the charcoal vaporized. The tin from the bottom can had melted and stuck to the rocks underneath. This is much to small to be of real use, it's difficult to fit the scrap into such a small crucible.
Sunday, November 9, 2008
Vectorizing
It kept bugging me that my Voronoi code didn't return anything but an image to double check, so I figured a way to go ahead and make it output SVG format paths. I also added some routines to help further simplify the paths, though the output still seems a bit rough. And it was a good thing to check my results, because the simple lengthening of segments somehow resulted in gaps in the path, the sort of thing that would ruin a circuit board. For now I just commented that part out and substituted code that checks if a line is trending in a direction, and then double checked against the error (measured as the sum of the distances from the proposed line to the pixels that would be removed).
I suppose that using Haskell for this might seem like an odd choice, but I'm more familiar with it than Python. The SVG image in this post should show up fine in Firefox. If your browser has trouble with it I'm sure you can Google around an get SVGs to display.
Vornoi.hs
Monday, October 27, 2008
Voronoi
 After seeing Forrest Higgs working on using Voronoi isolates (a version of a Voronoi diagram that starts with lines instead of points) I was inspired to write a similar program which turned out well. The basic algorithm is to expand pixels around a color coded line until it meets another color. If a pixel is neighboring more than one color it gets painted black, rinse and repeat until there's nothing white left.
It was a bit of a struggle to get PNG images edited in Haskell, but eventually I realized that pixbufGetPixels isn't really returning an array, it's returning an array typed pointer to a pixBuf. This makes sense in a practical memory usage way, but it isn't what I expected from the context.
After that I vectorized the edges, that took quite a bit of thought. First line segments were created between the centers of adjacent black pixels, then segments were created from the center of black pixels to any corner of the black pixel where there was a color change between neighboring pixels, and lastly segments between differing colors. This left a bunch of empty sets, and repeated segments, which were filtered out. That resulted in about 4400 segments for this test image. The next step is to lengthen vectors that are near each other in the same directions. That reduced the number of segments for this test to about 3700, it probably could be much fewer if I hadn't limited the angles (0, 45, 90, and 135) or if the underlying lines were horizontal, vertical, and perfectly diagonal.
For now I can't go much farther without hardware to test on...
Voronoi.hs
Sunday, September 28, 2008
X Axis
 The X axis is taking shape, I used an H shaped layout for the carriage, with drywall screws and skate bearings. There is no spring tensioner, the placement of the bearings press slightly against the rails, and there is enough give in the bed to fit it in without any play. This was accomplished by using washers as spacers between the end of the cross piece. With the two screws, after getting close to the right number of washers, the exact alignment is done by tightening or loosening the screws a small amount, this results in the end piece twisting, with a bit of finesse eventually it ends up being exactly right. The vertical alignment is simple by comparison, just use a single screw on the other end and tighten it, it should be no problem to force all four bearing wheels onto the track with the wood friction keeping the joint tight.
I also trimmed some plastic from the bed near the end to make clearance for the motor to be mounted to a threaded rod. There is a small tendency of the carriage to ride up out of it's slot, but when the rod is attached that will act to keep it from riding up. The profile of the rail should not matter much. The same setup should work fine with metal rod, pipe, angle iron, etc. Any profile where you have a straight inner surface, and a straight top surface.
Monday, September 8, 2008
Boxer Fan

I found a fan that looks a lot like a computer fan, but it's 110V and bigger. It was seized, so I removed the center from the bearings by persuading it with a hammer and a set. That released the blades and rotor. I cleaned away all the corrosion with emery paper, and sprayed it well with WD40. The bearings were still fine, so after pressing it back together the blades spun freely. I soldered a power cord to it and it runs OK; it's not too loud. I also rubber banded a 45 Gallon garbage bag to it to get an idea of the airflow, it filled the bag in five or six seconds, so it's probably about 60 cubic feet per minute.
Tuesday, September 2, 2008
Cooking with gas

I melted some more HDPE, this time I did it in the garage on a gasoline burner. I wrapped the plastic in aluminum foil to keep it from sticking to the pan. Then I squashed it flat between two pans and left some heavy chain on it while it cooled. I ended up with a 1/4" x 8" cookie of plastic sheet, it's mostly flat, and the foil is well stuck to it. I'm not sure what I'll use it for. Mostly I've just been cleaning and storing stuff from the pile. My second computer won't boot any more, it sat too long, or it needs a battery, and the power supply was always extra noisy, it locks part way through boot up usually. I wonder if this was related to the ethernet problem I had last month, even though that computer is off most the time. All the time now I guess, maybe I'll get a couple new power supplies, and try one in that. I need another computer for the garage anyways, so I can do the RepRap stuff there.
Tuesday, August 12, 2008
Router Table
 The Craftsman router table I picked up at a garage sale had an iron top with no real way to mount my router, it probably was designed around some Craftsman router that can be adjusted easily without needing to remove the router. That's probably why it was for sale! The base table is made from salvaged lumber from a headboard. The router table top is just a 3/4" plywood board, replacement for the iron. I routed out a spot to set the router, and a couple of slots to mount the fence. The legs needed a few scraps of wood to screw into, the holes at the tops are horizontal, so they screw into the scraps, then the scraps screw into the top. The wing brackets needed a few new holes, originally they sat a bit higher, because the old table wings were thin sheet, but the center table was cast with ribs that made it thicker. With the new holes they match flush to the top, and the angle of the legs is still the same. Drilled holes on the ends for a screw as well. My router didn't come with a mounting plate, so I glued two pieces of 1/8" Plexiglass together, one of the sheets got a bit of starring where the glue was, I'm not sure if this was a chemical reaction to solvents in the glue, or if it was stress from shrinkage, it seems to be fine structurally, I'll just have to keep an eye on it if it worsens. Hopefully I'll figure lots of ways to put the router table to good use.
Monday, August 4, 2008
Stepper circa 1993

Had a good day shopping at garage sales, there was a community sale where you didn't need to drive very far between stops. I bought a Twain flatbed scanner that has a good 1.8 degree stepper motor, and a base with side rails about 19 1/2 inches (500 mm), the stepper moved a belt that was hooked to the carriage after looping around a geared belt idler. The carriage had a lot of torsional slop though, it only has one horizontal keeper bearing on one side, and the other side has two, forming a triangle, but they are both on leaf springs, so it's free to twist. It'll probably be better to build a carriage than to re-purpose the old one. The stepper has a reducer gear hooked right to the mounting bracket, if I can figure out a way to mount the output gear to a threaded rod it would have very good resolution, there is very little slop in the gears, you can feel the slop a bit by touch, but it isn't visible enough to measure. The scanner also had a power supply that has 5v 2A, 15v 1.5A, +12v 0.3A, -12 0.3A, it's probably good enough to power a few more motors, and it's dead quiet, and slim-lined along the side of the case. This stepper was run from another ULN 2003A Darlington array, though it's a six wire stepper, so it should run from the Stepper Motor Driver 1.1.
Also got a nice shelving unit, so the giant pile of junk in the center of the garage is starting to get a bit smaller as I organize everything, hopefully it will soon all look like I meant it to be that way. It took a while to re-assemble the shelving because of the gravel floor, so it needed attached to the wall despite being a free standing shelf. Plus there was stuff in the way, but now most of that is on the shelves.
And I got a router table, once I get my router hooked to that it'll be a lot easier to build a RepStrap.
And I found some sort of lathe looking thing, If I can figure a way to attach a chuck I'll be able to make the non-printable extruder parts.
Later I salvaged some bearings from a set of inline skates, (14 of them, 2 are bad). The skates are from Goodwill, they had a large pile of skates.
Total cost of RepRap related stuff was $11, though the router table and shelf ran another $20.
Saturday, July 26, 2008
Hard Playdough

This is a glob of hard "Playdough" painted black. It's 1 part cornstarch, and two parts baking soda, 1.5 parts water. Bring to a boil and it polymerizes. I did it in the microwave. At that point it's very rubbery, but you can roll it and treat it like clay, with some difficulty. From there it's just a mater of curing it to be hard. I microwaved it to get it hot about half a dozen times then let it cool in-between. The finished bit is very hard, pie dough colored, with a coat of paint for looks and water protection. It's probably a bit more brittle than wood, but you can form it. This is probably good enough to RepStrap many of the Darwin brackets, though it'd be tough to get enough detail for the gears, and it might not be strong enough for the corner brackets.
Friday, July 25, 2008
Stepper circa 1983 details

Unfortunately it looks like the stepper I found can't be wired as a bipolar, it has five wires, four of them go to one end of the four coils, and the other one ties all the coils together. It was being driven from the transformer, then controlled through a Darlington array. This is a simple way to drive a stepper as long as you don't want to half-step, or micro-step. The Darlington was a ULN 2003A, which is rated to 500 mA, so the motor must be 500 mA or less per coil. Since you can't wire the motor bipolar, the Stepper Motor Driver 1.1 won't work to drive this stepper. Need to find or design a unipolar stepper driver I suppose. There's newer quad Darlington arrays available that can put out 1.5 A per channel for about $2, or you could run the common wire to ground I suppose. Maybe there's a way to get the motor casing open and re-wire it, though it looks spot welded.
Thursday, July 24, 2008
Stepper circa 1983
 I dismantled two Commodore dot matrix printers that were in the trailer, circa 1983, and one of them had an 18 volt stepper motor, there were some fuses labeled 1.6 amps, so I'm guessing that this stepper should handle 1.5 amps or so. There were also servo motors complete with attached encoder wheels, though there is a gap in the holes, I think that the paper advance would spin the motors one revolution and that was geared down to match the right distance. The other printer used a veritable tangle of wires, springs and gears to position the carriage with a solenoid instead of a stepper.
Saturday, July 19, 2008
Backyard Achaeology
 This week I've been cleaning out this cargo trailer. There's stuff in there that has been in there since the 80's, but remarkably, there are things in the stuff that date to the 40's. My grandfather worked at a failing hardware store before moving to Alaska to work for the Air Force as a civilian junk reclaimer. There's a lot of real junk too though, and the whole thing was flood damaged in '96, the paper boxes were falling apart, and there was dried silt dust enough to choke on. Odd stuff though, for example there's a hand powered hydraulic pump in perfect working order, but unattached to anything, just with empty fittings for hoses. Then there's a weather balloon, in a can, with a balloon valve, in another can, and hydrogen to fill the balloon, in another can, just add water. And propane, that's right, underneath all the boxes was a 5 gallon tank full of propane, rusting away, waiting to explode some day! Fortunately it seems that it's undamaged, and not really very rusty, but it's been in there for 30 years. There was one bag, inside it was a bunch of little pouch plastic bags with a metal tab for a sealer, inside the pouch bags was another plastic bag with writing on it, "while wearing, put mask inlet in bag and seal with rubber band, provided, don't breath into bag for too long, try not to store mask in bag, don't store food in bag due to toxic properties." In that there's a cardboard-foil pouch containing three rubber bands, on the pouch it says that the cardboard foil pouch is good to 500 F operating temperature. The rubber bands themselves are nice and fresh, strapped to piece of cardboard. This seems to be a lesson in bureaucracy.
Wednesday, July 9, 2008
Workbench
 The workbench is done, it took much more time than I had hoped, but it has a very sturdy surface, which is mostly level. Soon I'll be on to other more interesting projects, like RepRap. This was built entirely from materials on hand, some 4x4 fence posts, and some salvaged 4x6 joists, a sheet of siding, some short 2x6 scraps, and a pile of screws and nails.
Wednesday, July 2, 2008
HDPE Star

I melted some HDPE (2) from a laundry softener bottle into an aluminum star shaped mold meant for foodstuffs. It has a low glass transition, it was rubbery feeling when hot, even when very hot. (500 F) When I kicked it up to 500 it started to brown a bit, but it never flowed freely. From browsing the web I found that HDPE doesn't have benzine attached to the polymers like in PS, that is a big positive, the HDPE didn't smell at all, unlike PS. The result seems very strong and not at all brittle like PS as well. It never smoked. To mold this by hand you'd need to place the plastic under some amount of pressure, it seems to have a bit of memory to overcome. Pieces added to melt would stick, and then shrink and get thicker. It stuck well to the aluminum.
Thursday, June 26, 2008
Escher "Cubic Space"
 It's always good to use the right tools. Someone was asking on the POV-Ray news group about adding edge effects to a scene, and I realized that a paint program was a much better tool, and that some simple macros could duplicate the scene in minutes. I also saw on TV a nice portable sawhorse that converts into a large stable workbench with the addition of a door or a sheet of plywood, and it struck home that I've spent at least twice as much time setting a simple foundation for the permanent work bench I'm building as building the bench itself. Oh the woes of gravel covered dirt floor garages! Floors are a definite "to do". Here's some macros for those POV inclined, they're the floor in a POV garage so to speak.
// a line of object starting at a location and repeating at an interval
#macro LineOf(Obj StartPos IncPos Num)
  #local _COUNT = 0;
  #local _CPOS = StartPos;
  #while (_COUNT < Num)
    object {Obj translate _CPOS}
    #local _CPOS = _CPOS + IncPos;
    #local _COUNT = _COUNT + 1;
  #end
#end

// a ring of objects starting at a location and orbiting the origin by IncRot
#macro RingOf(Obj StartPos IncRot Num)
  #local _COUNT = 0;
  #local _ROT = <0,0,0>;
  #while (_COUNT < Num)
    object {Obj translate StartPos
      rotate <_rot.x,0,0>
      rotate <0,_rot.y,0>
      rotate <0,0,_rot.z>}
    #local _ROT = _ROT + IncRot;
    #local _COUNT = _COUNT + 1;
  #end
#end

// helix
#macro HelixOf(Obj StartPos IncRot IncPos Num)
  #local _COUNT = 0;
  #local _CPOS = StartPos;
  #local _ROT = <0,0,0>;
  #while (_COUNT < Num)
    object {Obj
      rotate <_rot.x,0,0>
      rotate <0,_rot.y,0>
      rotate <0,0,_rot.z>
      translate _CPOS}
    #local _ROT = _ROT + IncRot;
    #local _CPOS = _CPOS + IncPos;
    #local _COUNT = _COUNT + 1;
  #end
#end

// a grid of object starting at a location and repeating at IncPos and IncPos2
#macro GridOf(Obj StartPos IncPos IncPos2 Num Num2)
  #local _COUNT2 = 0;
  #local _CPOS2 = StartPos;
  #while (_COUNT2 < Num2)
    #local _COUNT = 0;
    #local _CPOS = _CPOS2;
    #while (_COUNT < Num)
      object {Obj translate _CPOS}
      #local _CPOS = _CPOS + IncPos;
      #local _COUNT = _COUNT + 1;
    #end
    #local _CPOS2 = _CPOS2 + IncPos2;
    #local _COUNT2 = _COUNT2 + 1;
  #end
#end
Thursday, June 19, 2008
Recycling Plastic

I melted some clear plastic spoons down in the oven. It's in a leftover artichoke jar. I'm not sure what kind of plastic they are, they're not really marked, if you squint it has B-4 on the handles, but it's not HDPE, it's probably some kind of PS, it was stable boiling in water, was a bit sticky at 350 F (176 C), but that might have been uneven heating from the broiler. It started gloppy flowing a bit at 400 F (210 C), so I bumped it up to 450 F (232 C), which made it pool in the bottom, but as the oven got to temperature it started smoking, so I shut it off and left it in the oven to cool slowly, so that the glass wouldn't break. Oh yeah, don't try this if you aren't ready for the jar to break, I expected it to break, I had it in a cast iron pan and it was preheated to even out the temperatures. The result is about 2 cm of hard clear plastic from having the jar full of broken pieces. As the jar cooled the plastic pulled away from the glass, making sounds that were very similar to cracking glass. There is a bit of bubbles in the plastic, but I think that this might be a workable way to cast plastic parts if you had an open faced mold, it was much to sticky to pour through a gate without something like an extruder.
Tuesday, June 17, 2008
Garage
I've wired 110/220 to the garage and got some cheap lights up out there, filled in the ditch and cut off one of the garage door rails that protruded far beyond the run of the door. The garage has a 12+ foot high ceiling, so there's been a lot of trips up and down the extension ladder. Most of the parts for the garage door were salvage, the door was extended to about 11 feet tall by adding sections, a standard door is 7 foot, which would have looked incredibly short on the front of a 15 foot building front. Somewhere along the line it all got messed up, but a pro garage door guy made it all work. Apparently the hinges on a garage door are not the same, they're numbered by the amount of offset from the wall brackets, not to mention the spring is different.
Still there's some leftover parts like a nice flat aluminum rail and some lumber. I've been thinking of building a Replicating Rapid-Prototyper (RepRap) , or some sort of Computer Numerical Control (CNC) mill. I've been unemployed for too many years and hope to at least break even selling something I can produce. The idea of being able to afford some of the equipment that can produce commercial quality output is exciting to me. The technical aspects are well within my grasp.
A little about me, I have a BS in computer science from St. Martin's University and a AS in electronics engineering tech from Pierce College, additionally I spent a year at Central Washington University studying electrical engineering, that was a turbulent time in my early life, I was married for a year, and I'm not sure I've ever really recovered from the divorce, I've been depressed and become an overweight middle aged escapist computer addict that lives with his aging retired mother. (God bless her.) I've got to do something to get out of this rut. On the positive side I've learned to be good with graphics editors, like Wings3d, that can be used to design parts for RepRap, I've also recently been programming in Haskell, a few years back I was doing some Java, before that it was C++. The list of computer languages that I've had contact with is somewhat large. When I was a kid they used to let us into the DOT offices after hours to mess with the computers and watch the payroll checks be printed out.
Tuesday, June 10, 2008
Earlier Idea

This is an earlier idea for a stepper rotor made from easy to find stuff, just a ring of holes to accept cut pieces of wire. You just drill the holes in a flat cylinder of something and then use a lathe to eat away the outer layer until the metal shows. I don't have a lathe and drilling that accurate of holes (100 of them!) would be a problem too.
Sunday, June 1, 2008
Stepper Refinements

I was thinking about it some more, and figured that some small registration tabs might help line up the support to the caps while attaching, does PVC pipe glue work on the various kinds of plastic? While lining up the tabs I realized that the bottom cap is different from the top cap, it's mirrored, it won't line up right just rotating it, so you can't just print two that are the same. So while I was at it I added some mounting brackets. I also enlarged the files to mm scale, as this is the RepRap default.
Cap Top, Cap Base, Support, Rotor, Bearing-Clip
Friday, May 30, 2008
Wire Wound Stepper Motor
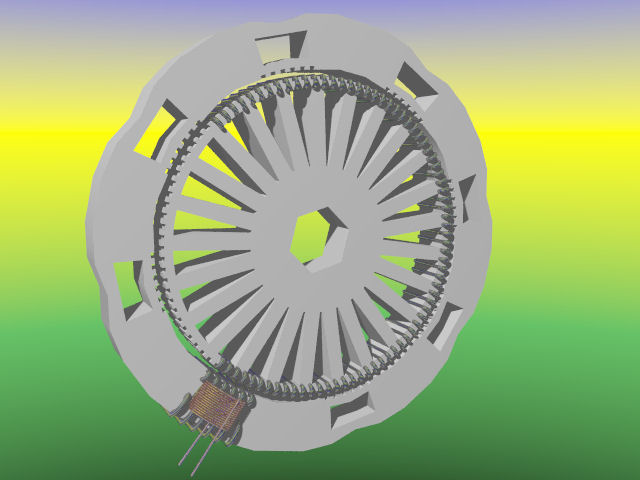
I'd like to make my own stepper motors. This should be much cheaper than just buying three motors for every Darwin RepRap that gets made, and matches the replication philosophy. The idea is to wind the rotor with with 17 gauge steel fencing wire, the kind that can be purchased in 1/4 mile spools, this would be instead of using a cast iron rotor.
I'm not set up to run an iron foundry, and I suspect that most people involved with rapid prototyping aren't set up to cast iron. In my browsing the internet it does seem to be possible for people to advance from aluminum casting to iron casting, but it involves several levels of difficulty beyond what the average back yard tinkerer would be capable of. There are a few folks who might be able to machine suitable rotors from bar stock, but in order to get 0.9 degree steps the rotor needs 100 grooves (0.9*4 = 3.6, 360/3.6 = 100). That would be fairly fine control of a manual lathe/mill to get even grooves every 3.6 degrees.
Of course, since I don't have a working Darwin I can't really test this concept out yet, I suspect there are weaknesses in the design that will become more apparent as the first prototype is put together. Here's a few I would look for.
- Bending of the wound steel wires at higher speeds.
- Difficulty winding the steel around the plastic without cracking the plastic.
- Securing the loose ends of the steel wire.
- Alignment of the bearing clips while gluing them to the rotor.
- Alignment of the caps to the magnet support, the rotor must not rub, but the bearings rest against the caps.
- Clearance to wind the copper around the steel core wires. I was envisioning the magnet core wires as being wound figure eight, but it's hard to tell if there will be enough clearance.
- The opposite magnets should be wound to have opposite NS alignment, but since the wires will be connected after securing the cap it might be easy to reverse them to be fighting each other.
- The linear actuator bearings need to be somewhat larger to fit over the cylinder and still have the lead rod clear, I've yet to price the bearings, there needs to be two, one for the top cap and one for the bottom cap, they might be more costly than skate bearings.
- Heating might be an issue, or warping, it's plastic after all. I did put some vents in the caps though.
Subscribe to:
Posts (Atom)